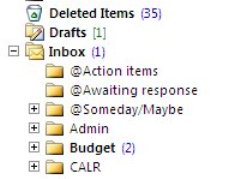
If you’re dealing with Gmail overload, then you have options to get organized and efficient. (If you haven’t yet read my blog post on email organization, then you may want to read it and come back: 4 Step to Becoming More Responsive). Google calls folders “labels”. Google starts you off with your email organization by automatically creating labels for “Promotions” & “Social” and filtering emails into those labels.
Here are three options for your Gmail organization:
Read your Gmail using any mail reader, such as Mac mail or Outlook. You can take advantage of the organization features built into those programs.
Manage your inbox through Google’s web interface. From that interface, you can create labels & filters, and also star important emails.
Manage your inbox on your mobile device using Google’s Inbox app.
Google based their Inbox interface on the idea thatmost of us use our email inbox as a to-do list.
Through the app’s interface, you “check off” an email item by swiping right to move it to “done”. You can also “snooze” an email, which allows you to select a time that the email will get moved back to the top of your inbox.
Filters are called “bundles” in the Google Inbox app. You can create new labels with rules. You turn filtering for each label off and on by selecting the label under the menu and disabling or enabling the bundle. If you have an email in a bundle that you want to follow up on, you can pin it so that it shows up as an individual email in your inbox. Then you can snooze it or create a reminder.
Here’s a great post on TechRepublic about creating Google Inbox bundles: Create Your Own Bundles
Your Google reminders are also part of Inbox. You can create new reminders or look at your reminder list and check things off.
Do you need some one-on-one or group help with your email management?
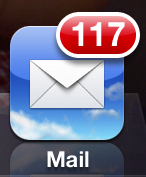
The average business worker sends and receives over 120 business emails per day and spends nearly 30 percent of the workweek managing email. Together with personal email, 205 billion emails are sent emails each day—a number expected to increase over 16 percent to 246 billion emails in 2019.
Email overload can result in anxiety and feelings of guilt.
It can be stressful to see your Inbox growing out of control and there is an increased risk of missing important email correspondence. Productivity drops when you have to spend too much time dealing with those emails, and distractions increase with those email notifications.
Fortunately, there are solutions to email overload. To start with, we need to be able to categorize those emails that we receive so that we can move forward with organization and management techniques.
Make Three Lists
I recommend taking a look through your Inbox and making three lists. Keep those lists handy for the next steps.
Red Category
These are emails that you want to see in your Inbox, and that you don’t want to miss.
Example: Emails from clients, customers, co-workers, vendors, contractors, etc.
Yellow Category
Identify those emails that you don’t want to miss, but can wait until the end of the day or end of the week.
Example: Emails from friends and family, industry associations, school and church mail lists, etc.
Green Category
Identify those emails that you only want to deal with when you have the time.
Examples: Newsletters, social media notifications, etc.
Once you have your three lists, you can work on an organization strategy for those emails. You can create folders for those yellow and green category emails and set up email filters so that they will automatically be delivered to those folders instead of cluttering up your inbox.
The folks at SaneBox, an email management app, have written a post here that you might find interesting: Email Triage, and you can read further advice from me here: 4 Step to Becoming More Responsive
Need some one-on-one or group help with your email management?
It’s very common to procrastinate on dealing with your chaotic email inbox.
Does this sound familiar to you?
You dread sitting down at your desk to look at email and feel guilty and anxious at the sight of your overflowing email inbox
You stay at your desk longer every day to try to stay on top of your email inbox.
The size of your email inbox keeps increasing.
You have not just emails from your co-workers, clients, friends, and family, but also emails from school lists, notifications from social networks, and newsletters from retailers, vendors, and consultants (including mine! Sign up here: http://www.digitalchaoscontrol.com).
You have missed important emails.
Unfortunately, it’s all too easy to miss important emails in the clutter.
Email is still an important communication tool but email volume continues to increase every year. It’s no longer possible to treat your email inbox like it’s a to-do list that keeps growing and growing.
How do we turn things around? There are differing opinions and advice on this. One well-known tactic is called “Inbox zero”, which is a technique that encourages you to take the time to look at each and every email and make a decision on it: delete, delegate, respond, defer or do. This is a great technique if you have the time and discipline to go through your email innbox every day, but most of us don’t have enough free time to prioritize email management. You may think that you’ll have some time later when things are less busy, but the truth is that your future self will probably be just as busy.
The first thing to do is to relax.
The size of your email inbox doesn’t matter. What does matter is that you’re not missing important emails or losing track of them, you’re responsive to your clients and co-workers, and that you can find the email that you need when you need it.
Don’t worry about getting to Inbox zero. There are other more productive and efficient ways to deal with email. Read this blog post: 4 Steps to Becoming More Responsive for some tips, and contact me for some one-on-one or group expert help.
It’s very common to procrastinate on dealing with your email chaos.
Does this sound familiar to you?
You dread sitting down at your desk to look at email.
You stay at your desk longer every day to try to stay on top of your inbox.
The size of your inbox keeps increasing.
You have not just emails from your co-workers, clients, friends, and family, but also emails from school lists, notifications from social networks, and newsletters from retailers, vendors, and consultants (including mine! Sign up on the right sidebar).
Unfortunately, it’s all too easy to miss important communication due to email chaos.
Email is still an important communication tool but email chaos continues to increase every year. It’s no longer possible to treat your inbox like it’s a to-do list that keeps growing and growing…
Many of us use an email reader like Microsoft Outlook, but in recent years webmail has become more common, particularly Gmail. There are ways to manage your email chaos whether you’re using Outlook, Apple Mail, or Gmail.
Here are my suggestions to get a handle on your email chaos:
The first thing to do is to create email folders.
These are to serve as repositories for less important emails as they come in. You don’t want those newsletters from your neighborhood grocery store taking up space in your inbox. You may want to read about this week’s specials when you have time, so don’t unsubscribe, manage your inbox instead.
I suggest creating a folder for each email list that you’re a member of, a folder for social network notifications, a folder for each category of newsletter, and a folder for “deferred” items. The point is to keep your inbox sparse enough so that you’re not spending a lot of time daily going through looking for the important emails. (And go ahead: unsubscribe from any newsletters or marketing emails that you don’t care about).
In Apple Mail, folders are called “Mailboxes”. In Gmail, they’re called “Labels”.
After you’ve created folders,the next step is to create “filters” – automatic programs that run within your email reader.
Filters search for specific criteria, which you define, as your email arrives and then perform a defined action based on those criteria. For example, your filter can search the “from” field for your grocery store name and then save the email to a specific folder that you’ve created in step one.
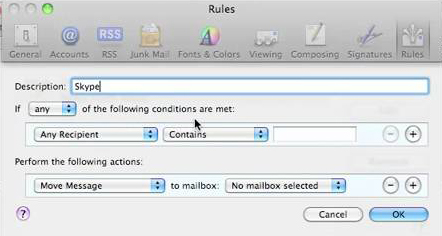
If you use Apple Mail, you create the filters using “Rules” under “Preferences” or using the “Smart Mailbox” feature. (Creating a Smart Mailbox creates a “mailbox” for emails that fit the rules but doesn’t move the original emails out of the Inbox). Apple Mail also has a useful “VIP” feature that creates folders for your favorite people – when you open an email from a favorite person, click on the star next to the “from” line.
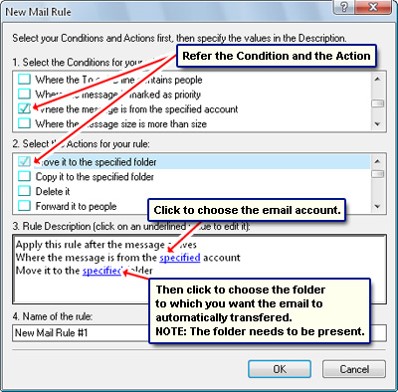
If you use Outlook, filters are called “Rules.”
Once you have your folders and filters set up, you should see a big improvement with your email chaos. The next step for Inbox management is to flag your emails with priority levels (Gmail uses colored stars), and then to sort your Inbox by priority, so that you can deal with your most important emails first.
This is not as easy as it sounds. How do you “deal with” those important emails, since some of the emails just require a response, but often they require creating a follow-up task?
There are ways to integrate your email system with a task management system, and I will address that in a later blog post. Stay posted!
Finally, you need to set up your email management routine, preferably by adding time into your calendar.
I suggest blocking out some time every day to:
Priorize and flag your emails
Deal with the most important emails, or create follow-up tasks
Move less important emails to a “Later” folder.
I also suggest blocking out some time every week to deal with the “Later” emails and to do clean-out of your other folders.
If you have a consistent routine, then you’ll find that you’ve become efficient and responsive with your email management. No more apologizing: “I’m so sorry, I didn’t see your email”!
SUBSCRIBE TO MY NEWSLETTER
Get the “Controlling the Chaos” Newsletter and receive a free PDF download “Drowning in Email – A Lifeline for Communications Overload”
You may or may not remember film photography – keeping exposed film in your fridge, dropping it off for developing, getting prints that you eagerly look through, picking out your favorites, and putting them in a photo album.
Now we have an abundance of digital photographs, and most of us are not taking the time to look through them and organize them, which means that when you want to go back and find those special photos, you might find yourself in a time-consuming and frustrating search.
Getting an organization system in place is something that you should start now for your future photos, and that you can implement for your past photos as you have time.
Most photo management programs organize your photos by date. When you need to find a particular photo, this system works fine as long as you remember the event or date that you took that photo. A better system would be to go back to that old-fashioned concept of photo albums: create events, tag people, and add categories.
Here are the steps to follow for a photo organization routine:
Import using your photo management software. Your newly imported photos will be organized by date.
If it doesn’t already exist,create a new album or folder for this year
Under this year, create a new album or folder for the current quarter (ex: Q1, Q2, etc.)
Under this quarter, create a new album or folder for each event.
Move the newly imported photos to the relevant event or to the current quarter if there’s no associated event.
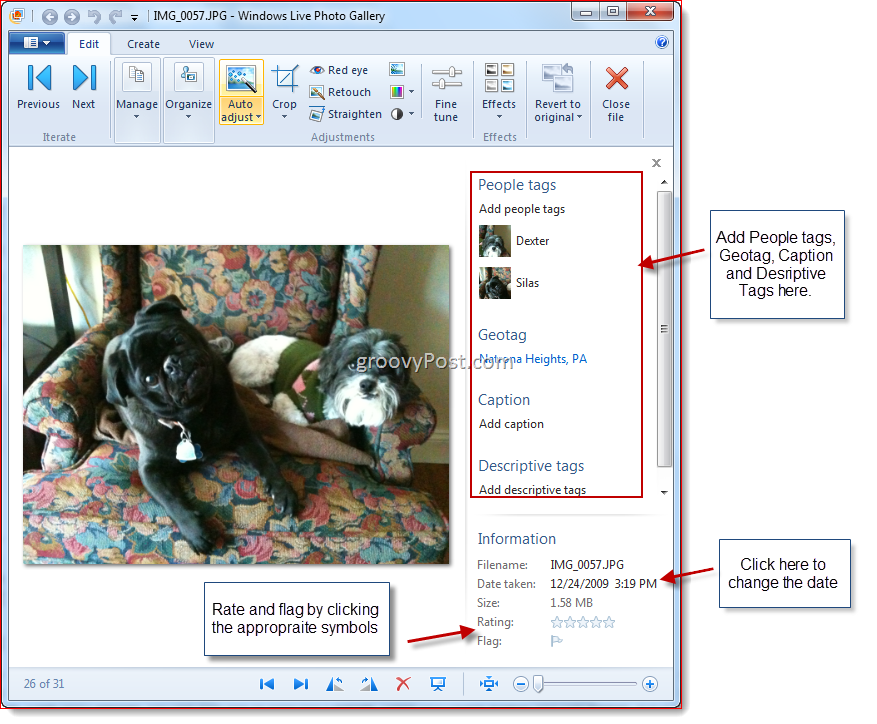
Select the photos for that event and add tags or keywords describing the event, date, people, etc. (Depending on the photo management software you use, this is calling “tagging” or “assigning keywords”).
Windows Photo Gallery: Adding TagsPhotos: Assigning Keywords
Organizing your photos by date and event allows you to easily browse through and find photos, and assigning keywords or tags allows you to easily search or sort by keyword.
Did you find this post useful? The way that we work with information is changing and you can help spread the word by sharing with your social media.
Do you have questions? Share them by commenting below or contact Patricia at 650.517.3142 or pat@digitalchaoscontrol.com for a complimentary consultation.
Going it alone is not always a good idea and can stall your progress, so it sometimes makes sense to invest in a coach.
I call myself a “productivity consultant” rather than a “coach” because I have years of expertise in technology, organization, management, and communication – all skills that I leverage to help my clients with their digital chaos. Coaches, such as business and life coaches, have expertise as well, but their skills are more centered on drawing out your strengths in order to achieve your goals.
However, I’ve often thought that what I do for clients is a type of coaching. Coaching can often involve developing skills & abilities and boosting performance, which is all very relevant in navigating digital chaos. Coaching also helps deal with issues and challenges before they become major problems – like when you can’t find that client information that you need right now, or that photo for your daughter’s graduation ceremony.
Another role of a coach is help clients to stay accountable to their goals. This often involves scheduled, regular sessions with the client. To this end, I am considering adding a service that will allow me to stay connected with my clients, to offer regular support, and to offer a community for getting questions answered. I believe that an ongoing technology coaching program can help my clients to venture out of their comfort zones and into new territory. A monthly subscription service would also help with budget planning.
I’m doing some market research that will help me to formulate such a service offering. If you would be willing to help me out by filling out a short survey, I’d really appreciate it!
In my coaching role, I act as a type of mentor – to help my clients think through their technology issues and to be more creative in solving them – through new techniques and/or new tools. I help them to find confidence in their potential to be more proficient and competent with technology. My coaching can convert a client who is reluctant to work with technology into an enthusiastic user.
My clients are all smart, creative, and extremely competent in their professional or family roles. I believe that I not only teach and train them, but that I learn from them, and I often stand in awe of their competencies that differ from mine.
By filling out the survey, you can sign up for a free, no sales pitch, coaching session, or you can do it completely anonymously – it’s up to you.
Facebook, LinkedIn, and other social networks have transformed our lives and businesses. They have opened up our worlds. They connect us with those whom we’ve lost touch with and they expand our networks of connections.
Unfortunately, it comes at a cost. Expanding our connections and networks leads to more information and contributes to our digital chaos.
One of the factors leading to digital chaos is the increase in emails.
We are inundated with social media notifications.
There are two ways to manage notifications:
Reduce the number of notifications that you’re receiving. You can manage this through your social media settings:
Facebook: Go to “Settings”, then “Notifications”
LinkedIn: Go to “Settings & Privacy” , “Communications”, “Email frequency”
Twitter: Go to “Notifications” at the top.
Filter notifications in your email reader.
Apple Mail:
Create a new Mailbox called “Notifications”.
Go to “Preferences”, then “Rules”.
Create a new rule that moves your notification emails into your “Notifications” Mailbox.
Outlook:
Create a new Folder called “Notifications”.
Right-click on a notification email. Select “Rules” and then “Always move messages from …”
Select the “Notifications” folder.
Social media notifications serve a useful purpose, as most of us don’t have time to check our news feeds all the time.
Make sure that you take the time to review your Notifications folder on a regular basis.
SUBSCRIBE TO MY NEWSLETTER
Get the “Controlling the Chaos” Newsletter and receive a free PDF download “Drowning in Email – A Lifeline for Communications Overload”
Did you know that Apple has replaced their both their iPhoto and Aperture applications with a single new application called just “Photos”?
Apple released Photos with the latest Mac OS X Yosemite update (OS X 10.10.3). To upgrade, just go to Software Update on your Mac and choose the OS update. Once the update is installed, then Photos will automatically import your iPhoto or Aperture library.
Photos works a lot like your iOS 8 iPad or iPhone photo app. You’ll see your photos organized into thumbnails by date, you can save photos into photo albums, and you can share on sites like Twitter, Facebook, and Flickr.
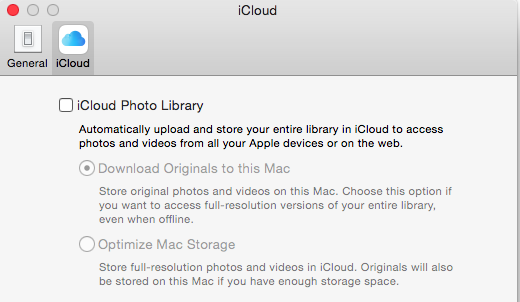
The update includes support foriCloud Photo Library. If you enable this option in Preferences, then all of your photos (it’s all or none) will be stored in iCloud and synced to any of your devices that have the option enabled under iCloud settings. That means that you can access your entire photo library on your mobile devices, and that any photo edits get synced as well. And the good news is that your mobile device will store only the thumbnail, not the full photo unless you choose to download it.
“But I’ve always had my photos in the iCloud”, you say? Well, no you haven’t. If you had Photos enabled in your iCloud settings, then your photos were going to Apple’s Photostream, which is not the iCloud.
Photostream is a mechanism for syncing your photos to your Mac over the Internet. Your photos were stored in Photostream for only 30 days (or the last 1000 photos). Photostream didn’t count toward your iCloud storage space, but iCloud Photo Library does. So if you plan on taking advantage of iCloud Photo Library, you’ll need to look at how much space your photos take up, and upgrade your iCloud plan accordingly.
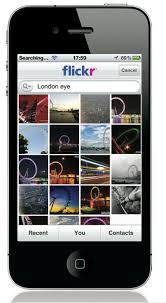
An alternative to iCloud Photo Library is Flickr. Flickr is not a cloud sync system, so photos saved to Flickr are copies in the cloud. If you delete a photo in your iCloud Photo Library on your iPhone, for example, then the photo will be deleted everywhere – in the cloud, on your Mac, etc. But since photos on Flickr are copies, they will be stored on Flickr until they’re deleted from Flickr. Flickr offers a whopping 1TB of free photo storage, and it has both iOS and Android apps.
Did you find this post useful? The way that we work with information is changing and you can help spread the word by sharing with your social media. Do you have questions? Share them by commenting below or contact Patricia at pat@digitalchaoscontrol.com for a complimentary consultation.
We may think that our computers come with massive amount of storage space.
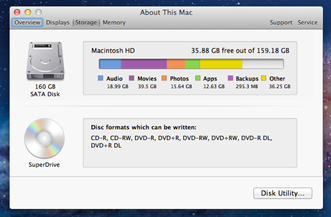
If you do have a very recent desktop computer, then it may be a very long time before you have to start paying attention to your storage space, but if you have an older desktop computer or if you have a laptop computer, particularly something ultra-portable like a Macintosh Air, then it is time to take a look.
As your storage space fills up, it can slow your computer down as well as put you at risk of running out of storage space just when you need to save that important document. Although there are no hard and fast rules and computer speed is dependent on many other factors, I generally recommend to my clients to start looking at storage space management once the hard drive is more than 60% full.
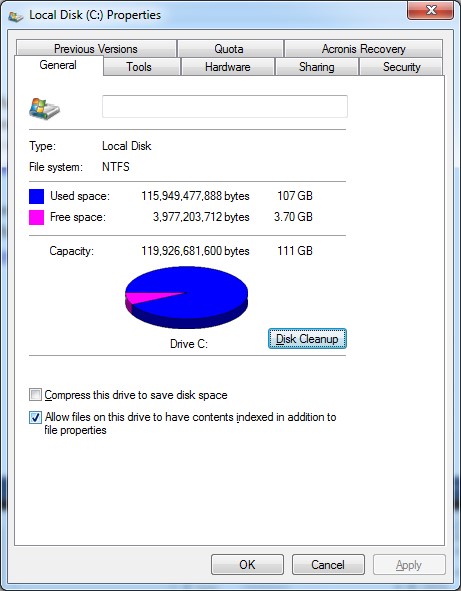
To check your available space from Windows File Explorer, right click on the C: drive and select “Properties”.
In MacOS, select “About this Mac”, and then “Storage.
Here are 6 ways to manage your storage space:
1. Clean out your Downloads Folder.
2. Delete unused apps: Use “Uninstall a Program” from Windows Control Panel. On a Mac, drag from your Applications folder to the trash can.
3. Clean out iTunes: You can move music albums and movies that you haven’t enjoyed in quite some time to an external drive or delete them.
4. Empty your trash: Right-click (Or control-click on the Mac) on the Recycle Bin or trash can icon and select “Empty”. (If you use iPhoto on the Mac, it has its own trash can that needs to be emptied from within the program.)
5. Run Cleanup: On a PC, you may have noticed the “Disk Cleanup” button in your disk drive Properties window. This is a tool to help to remove downloads, temporary files, and your trash.
6. Move photos to external storage: Photos and videos take up the most space on our computers. Split your photo library so that this year’s photos can stay on your internal drive and then move your older photos to an external drive.
Be sure to make a copy of your media archive on flash drives or DVDs as well because external hard drives can fail. You could also use a cloud storage service for your archive backup.
Did you find this post useful? The way that we work with information is changing and you can help spread the word by sharing with your social media.
Get the “Controlling the Chaos” Newsletter and receive a free PDF download “Drowning in Email – A Lifeline for Communications Overload”
In the old days, a library meant either a place for people to borrow books or a room in the house where books were stored. Information to manage that library was written on index cards and cross-referenced by a numbering system.
In today’s digital world, a library is a collection of related information, including the media itself – music, photos, etc. – and its associated information, called metadata.
Digital music libraries keep metadata about each song such as title, artist, album, genre, length, and play count. If you use Windows Media Player, then some of that information is stored in the music file and some is stored in a separate file created and used by the software. If you use iTunes, then most of the information is stored in a separate iTunes library files (actually 2 files). Music file formats are standardized so that all music programs can read metadata from the file (but depending on where you obtained your music files, you might have missing metadata information).
Music files should be ideally managed within the software. If you obtain some music files that you add to a folder on your desktop, you should:
Open your music software
Import those files to your music library
Have the software find the any missing metadata
Most music software will also allow you to edit the metadata.
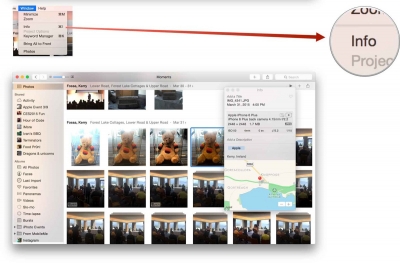
Your photo libraries use metadata as well – such as date taken, camera type, exposure setting, geotag, face tag, and descriptive tag. You should use photo software to manage your photo library, so that you take advantage of the metadata for tagging and finding photos. Most programs, like Windows Photos, keep your photos organized in a folder structure, but Mac Photos organizes your photos into a package file. You need to import all photos, not just the photos from your camera, but also photos emailed to you, into Mac Photos in order to manage them, and if you want individual photos for emailing or to post to social media, then you’ll need to export to individual files.
Media libraries were created to give us more ways to manage, sort, and find music and photos. As your media libraries grow, make sure that you’re taking full advantage of these features or you may find yourself dealing with more digital chaos than you can manage.
Did you find this post useful? The way that we work with information is changing and you can help spread the word by sharing with your social media.
Get the “Controlling the Chaos” Newsletter and receive a free PDF download “Drowning in Email – A Lifeline for Communications Overload”

 If you’re dealing with Gmail overload, then you have options to get organized and efficient. (If you haven’t yet read my blog post on email organization, then you may want to read it and come back: 4 Step to Becoming More Responsive). Google calls folders “labels”. Google starts you off with your email organization by automatically creating labels for “Promotions” & “Social” and filtering emails into those labels.

 It’s very common to procrastinate on dealing with your email chaos.
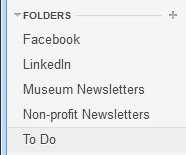 The first thing to do is to create email folders.
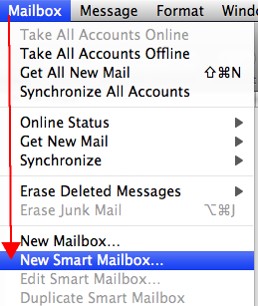 If you use Apple Mail, you create the filters using “Rules” under “Preferences” or using the “Smart Mailbox” feature. (Creating a Smart Mailbox creates a “mailbox” for emails that fit the rules but doesn’t move the original emails out of the Inbox). Apple Mail also has a useful “VIP” feature that creates folders for your favorite people – when you open an email from a favorite person, click on the star next to the “from” line.
 Once you have your folders and filters set up, you should see a big improvement with your email chaos. The next step for Inbox management is to flag your emails with priority levels (Gmail uses colored stars), and then to sort your Inbox by priority, so that you can deal with your most important emails first.